I have recently acquired a Tandberg TD 20 A.  This model was on my list of decks that I always wanted to own. It is a very good sounding deck, and received wonderful reviews in it’s days. It was compared once to a Philips N4520 and a Teac X-2000R in a magazine article and it came out 1st in some of the sections. I can not find the article at the moment, if I find it I will post the link here.
It is a deck from Tandberg, a Norwegian company. Not many decks came from Scandinavia, apart from B&O and some others. This deck is also available in 2 tracks, maybe I will come across one someday, I hope.
This deck came as ‘mechanical defect, does not run but signal in/output is good.’ So it will be a challenge to get it working. It also came with 2 very special Tandberg NAB adapters. 
First it will need a good cleaning. Especially the front aluminum is yellow-ish.
Cleaning
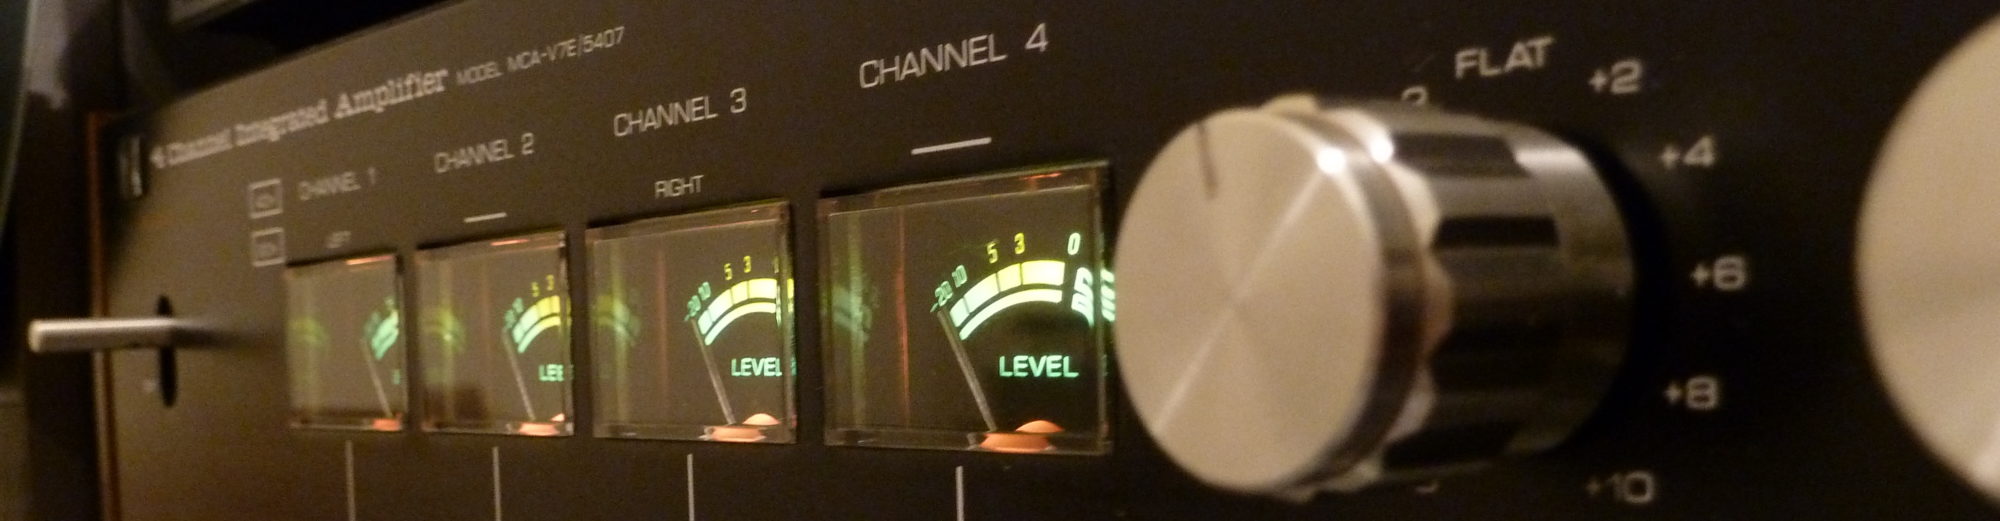
First I took the deck out of its casing. Then I took of the knobs and the front plates. The knobs were cleaned, and fortunately on the front plate the lettering does not come off! The black upper plate looks nicer now too.
1st checks
It powers on: good. It winds: good.
But it does not play. It appears the pinch roller, or better the arm on which the pinch roller is located, is stuck. This looks like a bad case of stuck grease. 
After disassembling some parts, including removing a split-pen, I was able to remove the arm. I removed the rubber roller and put it into a detergent solution for a night to revive it. I cleaned the axle from old grease and lubricated it. Now it moves again effortlessly. I checked, cleaned and regreased all moving parts. Also the gears on the 4th motor, that manages the tape handling, were stuck. Cleaned and lubricated that as well.

Then another issue presented itself: the left reel dish was scraping against the brake. I readjusted that table so that it is in the correct position again.
Cleaned the tape path and the heads, made sure the tape guides were smooth in their movement.
provisional play test
Then I put a tape on: it was working! This deck has a very smooth tape handling when starting and stopping. It is a delight to see this in action. Also the music on the tape was playing, so playback circuit was working too. This keeps getting better and better.
provisional record test
I noticed something odd: the erase head is not in the position that it should be: it is slanted and it’s position is too low on the tape path. Apparently the construction on which it is mounted was dented once. This is an issue for later. Now I will just use my bulk eraser to erase a tape and record on that.
I put on some Agfa pe36 (which is not a very high end tape, but als not budget – a kind of ‘well, ok’ -tape) and the difference between source and tape was almost non-existent!. This is a very good deck as-is even without the maintenance, adjustment and calibration that I will perform on it.
NAB adapters
The matching NAB adapters have 2 peculiarities:
- they haven’t got a clamp en turn mechanism like the ones from Teac and Philips etc. Nevertheless it works well: the outer ring covers the NAB hole in the reel, and the trident from the deck grabs the whole tight to the reeltable. Looking at it this way you could say that the other manufacturers have come up with a far too complicated construction 😀
- using the large 26cm reels with these adapters, the reels are too deep relative to the tape path and the tape scratches the rim of the reels. This is mentioned in the manual: a disc is to be used to lift the reels a few mm. When I use the other brand’s adapters, there is no problem.
The tape guide arms can be adjusted to bring the tape lower to the reels, but I will not do that as I suspect trouble with 7 inch reels.
erase head problems
There is a strange thing going on with the erase head. This is the very first time that I experience a skewed erase head. And it is not only skweded but it is also too low.It looks like it has been pushed down. The construction is weird: the head is mounted on top of a kind of tincan strip which is Ω omega shaped. And that is dented. And while pushing it up again, one side broke.
What I did was load some blank tape, and by that I mean see-through tape, and line up the erase head. I put some nuts and ring under the plate until it was level with the tape. After adjusting the other mounting screws of the head my erase head was level again and at the right height etc. I tested it with erasing and it seems to work just fine. And I could always use the deck for playback only. Or first bulk erase the tape before recording with this deck when it won’t work after all.
measuring
After all the mechanical adjustments were made, the unit was cleaned, lubricated, demagged, etc etc I ran some tests to determine how well the deck was performing.
Wow & Flutter, 19 cm/s 9,5 cm/s:
flutter: 0,1 0.15
wow: 0.03 0.08
unweighted: 0.1 0.06
weighted: 0.05 0.15
DIN measured. The values still match the specs quite well!
Distortion: 1kHz 1,2V input:
0.14 % with DUT on ‘source’
0.5 % with DUT on ‘play’ but still on ‘source’
0.75% with DUT on ‘tape’
Tape is Maxell UDXL 19 cm/s. Around 0dB on VU meters.
frequency sweep
Then I proceeded to measure the frequency response. Although the deck sound very good, what I saw on the screen I wasn’t very happy with:
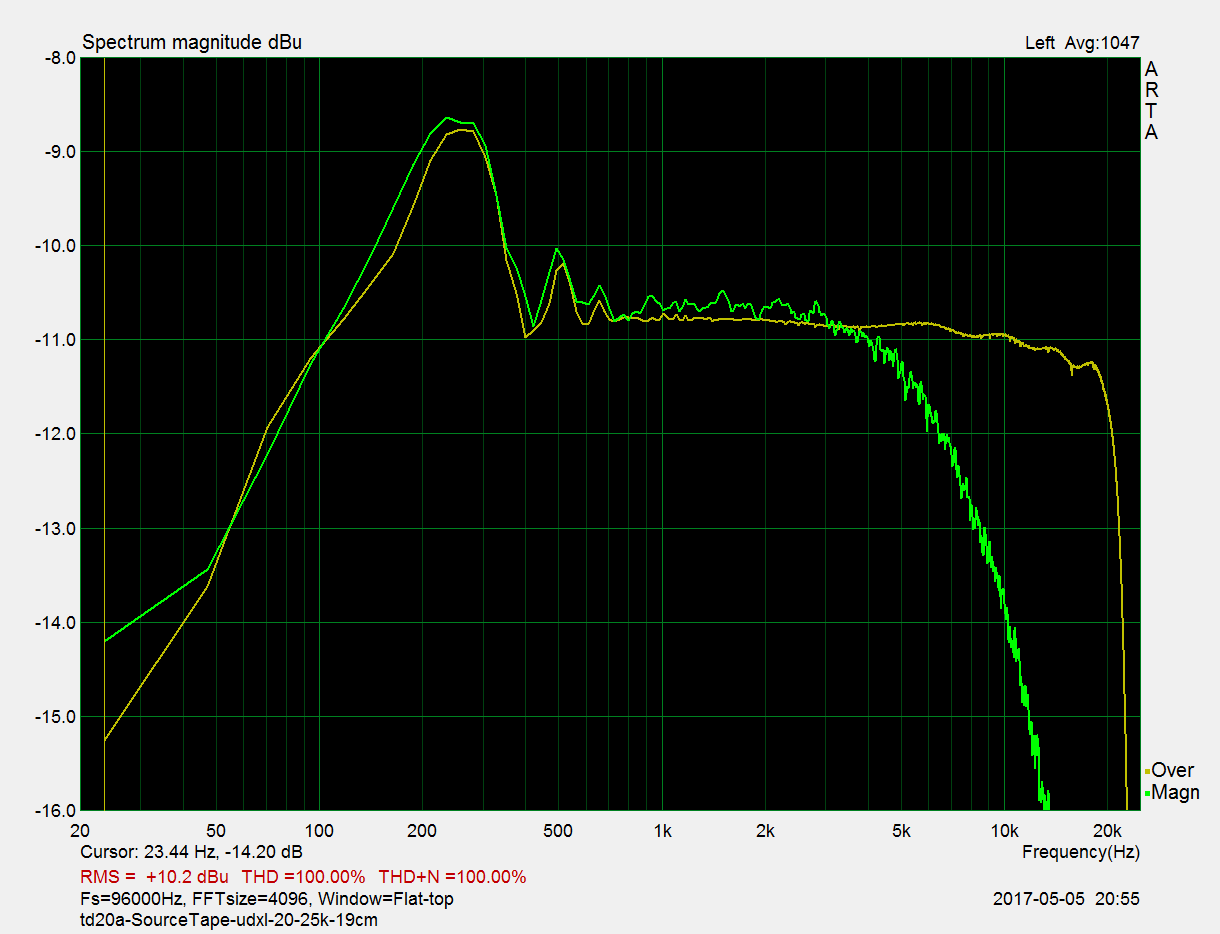
Yellow line is the source sweep, from 20-20kHz and measured through the deck in ‘source’ mode, and the green line is what comes back from that same sweep in ‘tape’ mode.
calibration tapes
I was sure that could be improved upon, but I wasn’t sure what was going on. It could be that recording was the problem, or playback, or both. So I mounted not one, but two (!) calibration tapes to examine the playback frequency curve. The result was this:
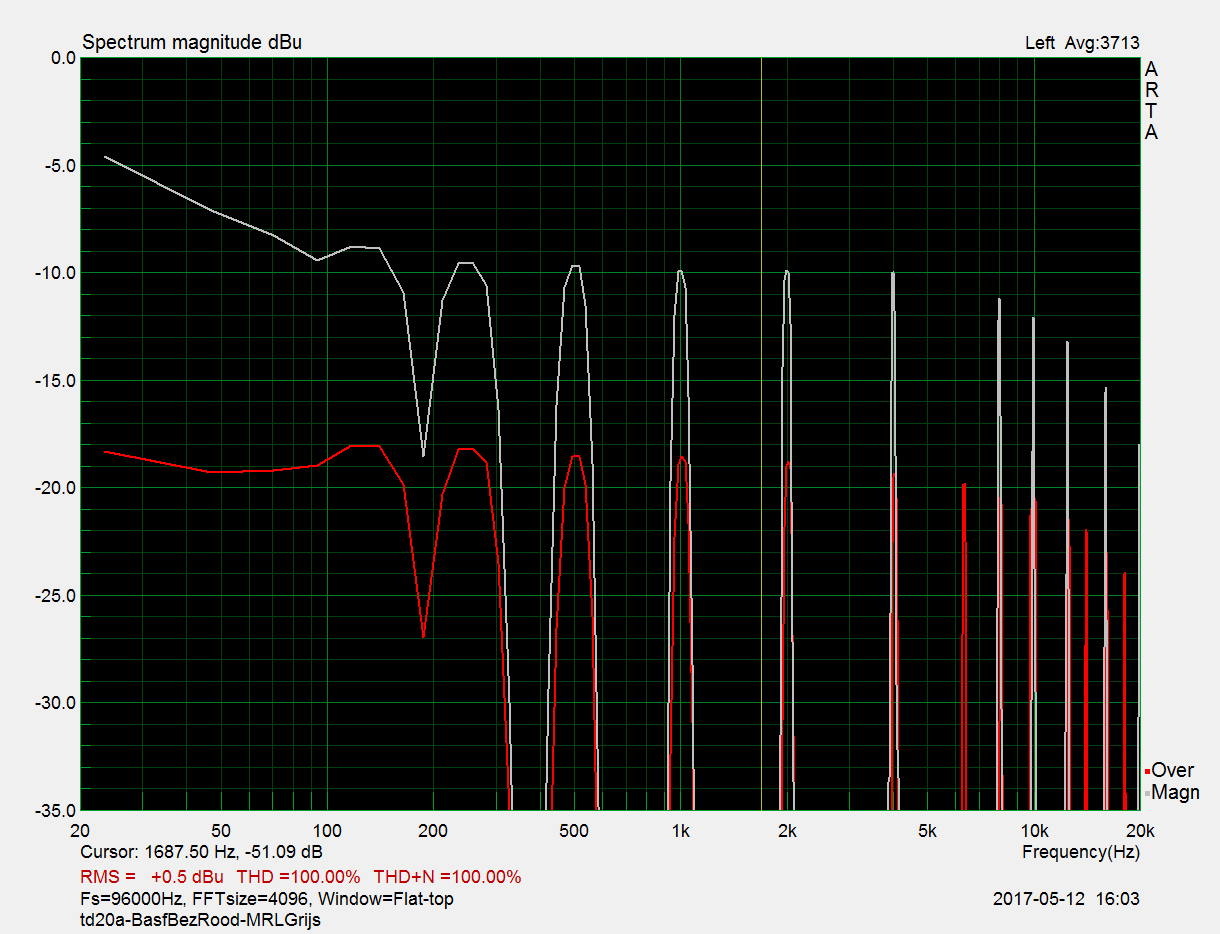
The red line is a BASF Bezugsband and the white line is a brand new MRL tape. Apart from the difference in levels, which is solely for the purpose of the graph, the frequency run is fairly identical. There is fall off in the higher frequencies on both tapes. So there is a problem with playback at the least.
REMARK: the BASF tape is IEC, the MRL is a NAB tape.
head alignment
I continued to go through the complete Service Manual of the deck. Starting with heads alignment, that already gave some better high frequency response because you not only align the playback but also the rec head.
After that I followed the rest of the service manual and calibrated the levels, the bias and the freq. curve. After I was done, the result was spectacular:
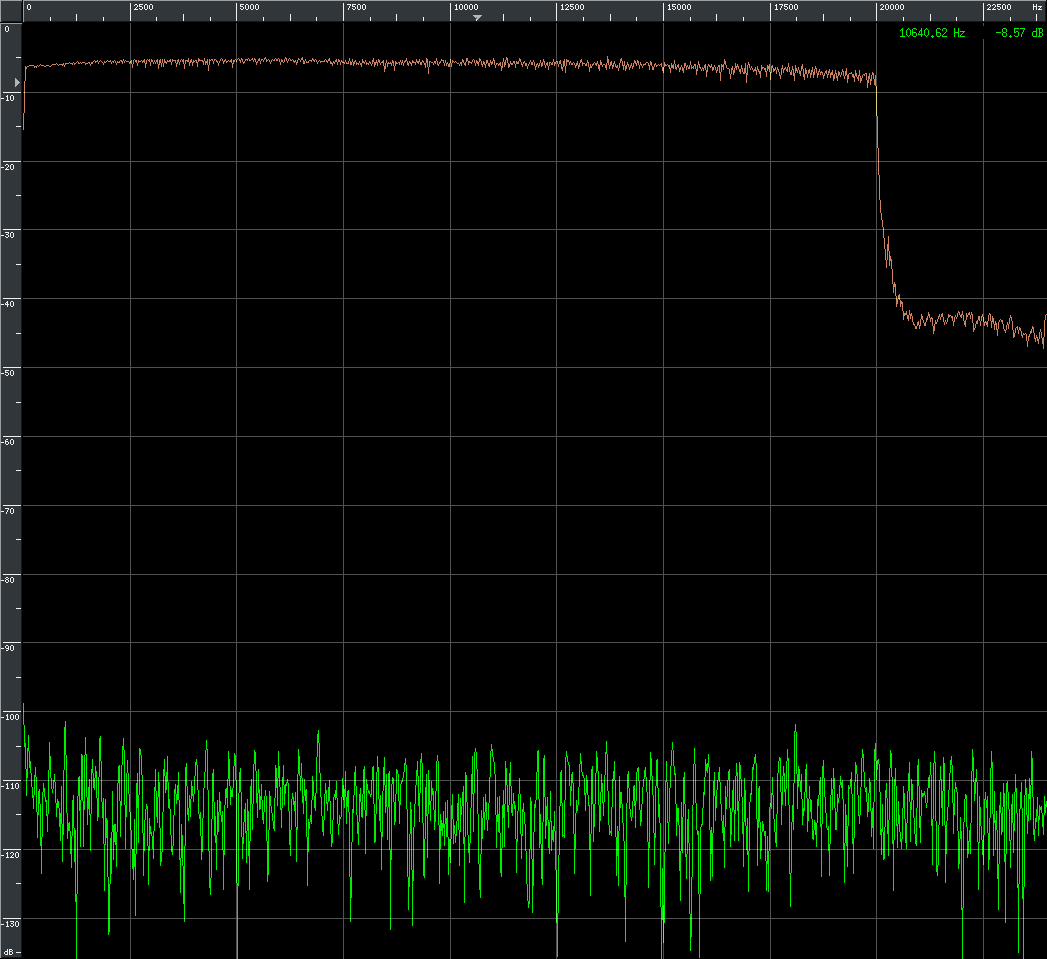
This is a recorded signal played back. The sweep is almost straight. At least as straight as I will (can) get it. The image comes from a new program that I found called BAUDLINE. It runs on linux and is very fast. I use the ‘peak smoothing’ feature to create a sort of peak-hold.
listening tests
After that was done, all the work I planned to do on it and that was necessary on it was done. The subsequent listening tests were a revelation: the deck sounds so good that even my trusty old Philips N4520 was left a bit behind. May need to rework that one as well sometime 🙂
Update:
at the moment the frequency curve when playing the BASF Bezugsband is like this:
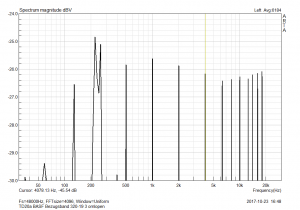
Note that the curve is straight within +/- 0,5 dB !!
(the part around 250 Hz is not testtones – it is the announcement of the tones on the tape)
Hi
Have a tech question about the td 20a, 4track – 3.75/7.5 ips deck:
The playback equalization, factory setting, ist it nab or ccir? If ccir, can this model be changed to nab?
Thnx
David
Hi
I’ve just bought tandberg TD20A SE, 1/2 track high speed. It is in a remarkable condition, hardly used, the bias seals on the front are still intact. I am using maxell ud xl I. I think the play/record curves probably need callibration the heads have virtually no wear and the position has not been adjusted since factory setting, however I notice that there is a bit of a drop in high frequency and that is particularly obvious when special equalisation is on. I do not quite understand the calibration procedure from the manual. Do I need an oscilloscope? You obviously used one, or can I just use voltage measures ? Any advice would be useful.
Hi Stefan,
Congrats on your purchase.
If you think you have a drop in the frequency spectrum, you need to do something about that. A scope is not neccesary, but it is handy. A good AC true RMS voltmeter can do the trick. But it has to be able to measure up to 20 kHz. Some digital meters don’t sample often enough. Check internet for that. If you have an analogue meter you’re ok.
But you do need a calibration tape with frequency tones on it. I use MRL tapes.
You can go a long way if you use your soundcard with ARTA software, look into it.
Good luck!
-Philip.