Of course.
So I just got my Studer B67, from Germany, and I was still very much enjoying it, when the opportunity arose to buy a Studer A810. I know. When it rains, it pours.
The Studer A810 came from a company that services professional studios all over the world, and has been in their possession for a number of years and was still in use regularly. So it came with a bit of assurance that it would be OK. It had been recapped and kept in good working order.
The price however, was very steep. So that price, and the fact that I had júst gotten my B67, made me hesitate to buy it. I doubted a lot, and then some more, but I finally took the plunge and did it anyway. I did it also because in 2014 I bought my Studer A80 also at a (then) high price, but that price is now a joke. It’s nothing. It is worth so much more now. And I never ever regretted the purchase.
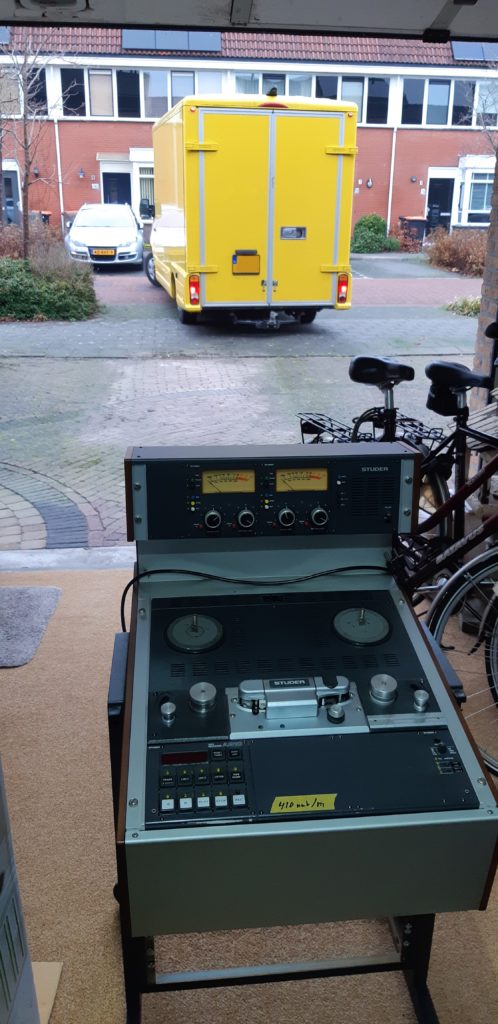
So then it was a matter of getting the deck. It is a bridged version, which means that the deck is in a console with an overhead VU-meter bridge attached. It is a complete package, but it is also a challenge to transport. Luckily the company that I bought it from, offered to bring the package to my home in their truck. They often have to do this I suppose in their line of work, which is servicing studio equipment.
Package for you!
So a few days before Christmas 2021 a big yellow truck pulled up on my driveway and 2 guys stepped out. I was very excited as they wheeled the A810 into my garage.
We had a nice talk about it and taperecorders in general. After they had gone I wheeled the deck into the living room, because, as it was a cold damp day, the deck needed to be acclimatized before turning it on.
The first power-up
So the next day, after having spent the night in our living room, and being all warm and cozy now, I dared to turn the A810 on for the first time. You only get this feeling once! After loading a tape I plugged in a pair of headphones, as I have no equipment to hook it up to in the living room. I have a nice tape that is recorded on my Studer B67 that sounds great. The deck and the tape did not disappoint!
I played around with it and I was pleasantly surprised at the smoothness of the tape handling. I got myself familiar with the keys on the keypad and their functions. I loaded some pancakes to try out, and that too was very enjoyable.
I was a bit disappointed because there are 2 headphone connections, one in the bridge and one in the deck. The one in the bridge turned out to be mono, and the volume of the connection in the deck was way too low to be able to listen to the music at a normal level. I could of course do that upstairs, but that would have to wait a bit until we managed to get the console upstairs.
Then, I was very curious to find out about the various cards in the machine. I opened the flap, or tray or however you want to call it, at the bottom of the frontpanel with a hex key and found this:
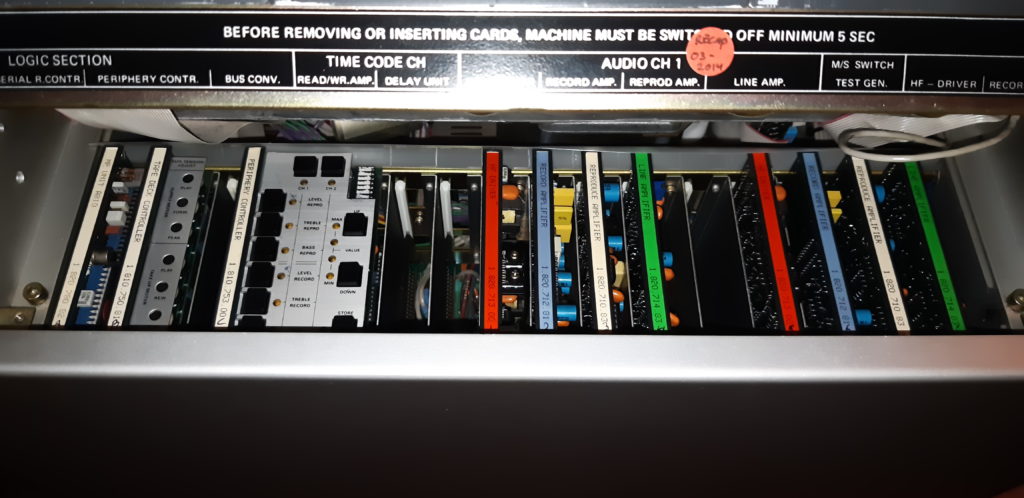
From left to right:
MPU Unit 1.820.780.82
Tape Deck Controller 1.810.750.81
Periphery Controller 1.810.753.00
channel 1:
HF Driver 1.820.713.00
Record Amplifier 1.820.712.81
Reproduce Amplifier 1.820.710.83
Line Amplifier 1.820.714.83
channel2:
HF Driver 1.820.713.00
Record Amplifier 1.820.712.81
Reproduce Amplifier 1.820.710.83
Line Amplifier 1.820.714.83
Upstairs at Philip’s
After a couple of days, it was time to move the A810 upstairs. For that I removed the A810 from the console and transported the deck and the console separately because of the combined weight. Separate it was doable.
In my ‘studio’/’mancave’/’hobbyroom’/’repaircenter’ I could finally listen to my new Studer and appreciate the sound through my headphones at a normal level, using the MAckie 24.8 output, and over the loudspeakers (KEF) at room level. Again, it did not disappoint!
Recording
Time to do some test recordings. The recorder was calibrated on SM900 for 38 cm/s for Tape A setting. I used my FiiO K5 Pro Digital Interface to play 24/96 tracks from Yello, Steely Dan, Dire Straits, and also some other less audiophile artists.
Later I also did a test recording from my Pioneer CD player which has XLR outputs directly to my A810. I have installed the Pioneer in the 19-inch rack that is located in the console below the A810 recorder, so now it is easy to connect them for a recording.

Tinkering and maintenance
After a few weeks, after getting really comfortable with the deck I was able to reprogram some of the keys on the deck to a different function. The Studer A810 makes that possible, and now the button layout is more intuitive for me.
So I now have 2 memory slots for tape location.
A slight problem
After a few months the deck developed a problem. When it was idle, sometimes out of nowhere the clapms on the tension arms would engage and release immediately, and that clicking would occur a few times. Also, the PLL light indicating capstan speed would blink on occasion.
I contacted the seller, who has a repair business for professional studio tape gear, and he suggested to look at the connectors and the settings of the tension arms. I investigated and found nothing wrong at first sight, but I started to calibrate the left and right tension rollers nevertheless. I quickly discovered that I needed some special Studer gauges for the adjustment. These were, of course, nowhere to be found and/or very expensive to get hold of.
Fortunately, there was a close up photo of such a gauge on internet. I found the correct dimensions and adjusted the image and made my own version in a CAD-drawing program. You can print it out and use it to adjust the left and right tension arm according to the official service manual. Here it is:
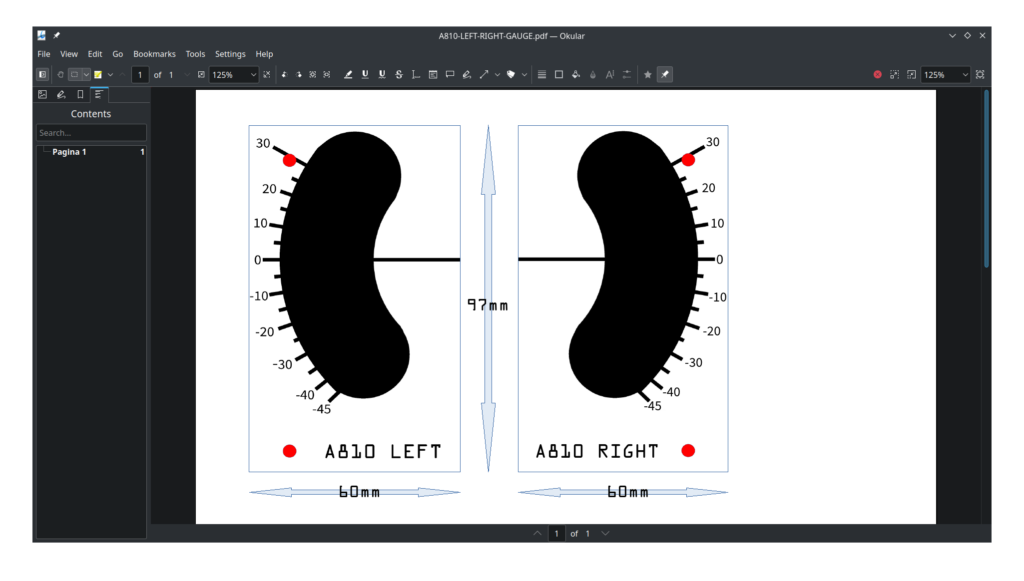
You can find the file on my site, https://www.reeltoreel.nl/ in the Studer section, Documents, A810.
After adjusting the tension arms and checking and securing the connectors on the hall sensors the problem did not occur again. Oh, and I had to adjust the position of one of the sensors for it to work correctly.
Calibrating Tape B
When I got the A810, only the Tape A / 38 cm / CCIR setting had been calibrated, to SM900 @ 410 nWb/m. But I have a lot of AGFA (BASF) PER528 tape that is very good and that I would like to use. So I took the manual and started calibrating for that tape.
The Studer A810 has 2 settings: Tape A and Tape B. It has 2 EQ curves: NAB and CCIR and it has 4 speeds (9,5 – 19 – 38 – 76 cm/s). That gives a total of 224=16 possible combinations, each of which can and has to be calibrated separately.
I say that now, but it is not entirely true. Some settings are the same for NAB and CCIR, like low speeds.
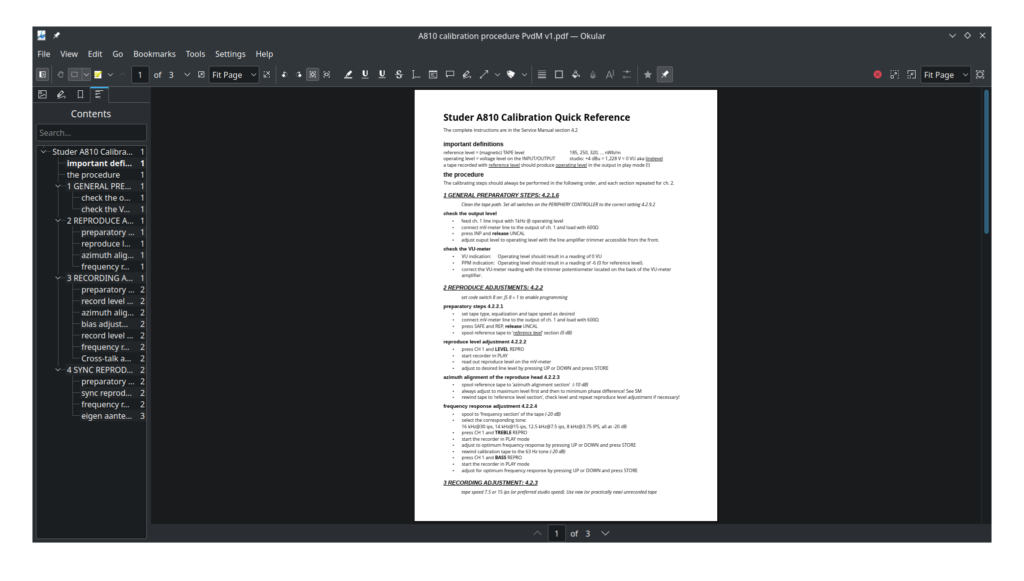
Now I won’t go into the details of the complete calibration, because that would far exceed the purpose of this blog, but it involves setting the parameters into the computer instead of twisting pots like in other conventional tape machines. I will probably do a video on that in the future, so follow my Youtube channel https://www.youtube.com/@PhilipvanderMatten to be able to see that.
I also made a handy spreadsheet (or paper sheet), where you can manually enter all the data that you store into the memory during calibration, or, if you wish, read all memory data that is currently stored and fill it out on the sheet to have it handy for when that data might be lost. You can find that on my site as well, https://www.reeltoreel.nl/ in the Studer section, Documents, A810.

While I was calibrating the Studer A810, I also made a short summary of the calibration steps from the Service Manual. This is much easier to handle than all those pages from the SM. Again, you can find that on my site as well, https://www.reeltoreel.nl/ in the Studer section, Documents, A810.
Replacing eproms.
The Studer A810 is a computerized deck, that means that it has a microprocessor built in. In this model it is the Motorola 6803. A microprocessor always follows a program, which in this case is built into an EPROM chip.
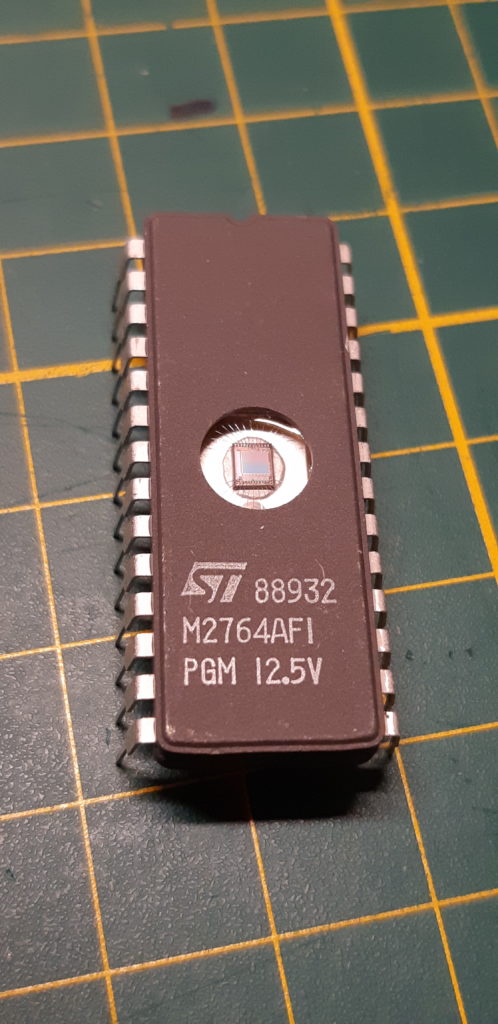
It is called the firmware. This was common practise at the time (1983). When the unit is turned on, the display will show the version of the firmware. Newer firmware version were issued by Studer later in the production cycle of the A810 and they fixed small bugs and had little enhancements. The firmware version 01/88 is considered the best and latest, firmware versions that came after that were merely fixes for synchronizers (to sync the tapedeck to other decks or to SMPTE timecode).
So I wanted to upgrade my firmware from the version I had which was 13/83 (week 13 1983) to that 01/88 version. Newer EPROM chips could be obtained from sellers, to replace the chips on the MPU board (containing the microprocessor), but they were expensive and I really wanted to burn the chips myself. Also I wanted to be able to later offer this service to other deck owners. We got to help each other, right?!
So I bought an EPROM programmer, an UV-light eraser and some empty EPROM chips. I obtained the files for the new 01/88 firmware from a well known American Studer professional and successfully managed to burn my own EPROMS.
I made a video of that which you can find here:
https://youtu.be/MVfTqoUg3xM
Hi Phillip
Iam looking for a Studer A810 basisboard „motherboard“
Do you have one for sell?
Best regards
Hi Yasin,
Sorry, no.
Hey Philip,
I recently bought a Studer A810 in great shape but the battery on the MPU board leaked all over the PCB. I’ve recapped the whole deck and changed many corroded ICs and IC sockets. I’ve even burned new EPROMs (0188).
Now it’s working flawlessly for around 20 minutes but then it crashes and shows EEEE2 (data error in EPROM 2). I’ve tried different EPROMs with no luck. What could be the cause of this issue?
Thank you in advance!
Alex
Hi Alex,
Sorry for the late response. First congrats with the new A810!
You seem to have done all the right things already to get it up and running.
As you have already tried different EPROMS I suspect it may be a damaged trace somewhere on the PCB? Caused by the leaked battery……
You could try swapping the MPU board with a known good one. It may be a long shot but there are new ones made:
https://studer-mpu-boards.com/shop/ols/products/mpu-unit-for-studer-a810-choice-of-firmware-versions-available
Where are you located?
-Philip.
Hi Philip,
First of all happy new year! Sorry for the late reply. It’s been a busy couple of months.
I kind of found the problem. First i changed the IC sockets for the EPROMs, the SRAM and the processor because they were slightly corroded but that didn’t fix the issue. Then I replaced the new EPROMs with the original ones. Guess what, the problem never showed up after that. Of course I checked the whole PCB for broken tracks and cold solder joints before all of that work.
The deck already ran for 16 hours without a single issue.
Another weird issue I had was a break in the wiring in one channel going from the Repro head to the head Pre-Preamplifier. Both channels were working with the head shield up but as soon as I flipped it down one channel went silent. I’ve replaced the wires for both channels.
I‘m really happy to see this deck up and running and working perfectly. Now I‘m satisfied with my collection (for now at least…) haha
My dad liked it so much that he wanted one too. He bought an ex BBC deck which I already restored. I had to replace the custom front panel with the original modules but now I have a big gap in the front panel so I‘m looking for the original VU modules or the metal blanking plates.
Btw I live in the west of North Rhine Westphalia, Germany. Restoring and servicing vintage audio equipment, especially reel to reel decks is my hobby. I also build amplifiers, preamps and headphone amps, both solid state and tube.
-Alex
Hi Alex,
Congrats on finding the fault! Also it is quite rare that you and your dad both have a A810, wonderful!
To be honest, I think I also have a wire (or connector or pcb trace) problem in probably the same area. The right channel sometimes cuts out but comes back when I look at the back and mess around a bit. Still have not got round to look deep into it. Like you, I have repairing vintage reel to reel decks as my hobby. Right now I have just received a B67 with a strange problem on the bench.
-Philip.
Can anyone help me i switch on my a810 after some days it shows 44444 no movement not working
Hi, do you have the possibility of making a comparison recording (video) of some music with this tape deck? So that one could hear a before / after going to tape on an A810 in order to get a good idea what this particular machine does to the sound? It’s difficult to get an idea of what the device sounds like based on forum posts and the likes. For some machines there are videos up, but not this one. I’m curious about how it compares to the A812, which is the only big Studer machine of which I know the sound, and I wonder if one can get that same sound from the slimmer 810. It would be lovely of you, but of course a bit of work.
Thank you, D.
Ik heb onlangs met interesse je eprom video bekeken. Goed bezig! Door een nare onstandigheid ben ik in het bezit gekomen van een goed werkende Studer a810. firmware 1363. Hij doet alles, ook de windows afstandbediening via de seriele poort, kreeg ik aan de praat. Het enige waar ik tegenaan loop is, wanneer hij na een tijdje warm wordt, na een herstart na ongeveer 5 seconden weer vanzelf stopt. Even snel de aan en uit knop switchen en hij doet weer normaal. Dus er is een oplossing. Vraag, je voelt hem vast aankomen, zou verholpen kunnen worden met een set emproms van jou makelij of ben je onbekend met dit euvel? Vast bedankt voor het lezen en antwoorden. Mvg René
Hoi René,
Firmware 1363 bestaat eigenlijk niet. Dus dat is al raar.
Wat bedoel je precies met: “wanneer hij na een tijdje warm wordt, na een herstart na ongeveer 5 seconden weer vanzelf stopt”?
-Philip
Ha Philip! Een paar dagen niet gekeken op je site. Ik heb het verkeerd opgeschreven moet zijn firmware 1383 ipv 1363. Nog even een uitleg over de afspeelfout. Als je tussentijds stopt met afspelen van een tape en daarna weer op play drukt, stopt hij na een seconde of vijf. Dat doet hij alleen als alles warm aanvoelt. Zou nieuwe firmware kunne helpen? Zoja, dat koop ik die graag bij je. Of heb je inmiddels ‘ruimte’ om dit apparaat onderr handen te nemen? Verder heb ik inmiddels een doos reserve onderdelen en een ordner vol info over a810. Mvg René
Hallo René,
Ik denk niet dat nieuwe firmware dit gaat oplossen, het klinkt echt als een ‘hardware’ fout. Maar dat gezegd hebbende, de firmware 88/01 die ik ook draai, staat bekend als de meest stabiele.
Binnenkort heb ik weer ruimte om reparaties aan te nemen, er staan er al weer 4 op de reservelijst helaas. Heb je een colsole of een losstaande A810?
-Philip.
Hallo Philip! Dat is een snel en helder antwoord. Kun je mij op de lijst zetten voor dit ‘afslaan’ euvel? En ja hij staat op een console. Niet van studer waarschijnlijk maar wel ideaal. Hij kan in de laagste stand onder één van mijn bureas. Hij is van mijn beste vriend geweest, die helaas een aantal maanden geleden is overleden. Heb je een email adres waar ik de foto’s van a810, de ordner, en de reserve onderdelen naar toe kan sturen? Mvg René
Already done so.
Hi Philip! First of all thanks for the good work you’re doing with this website.
Now, to the point: my Studer A810 exhibits some weird behaviour:
1. FWD and REW is stopping after a couple of seconds, i cannot rewind a tape completely, i have to move the reels to another deck . When the rewind is stopping, it seems that the MP Unit is resetting and i see the firmware version (13.83 in my case)
2. in PLAY mode, after some time (not consistent, it can be 20 minutes, one hour, or doesn’t exhibits any issues) the speed is changing from 7.5 IPS to 15 IPS and the speed LED is flashing a bit
The MP Unit is 1.810.780.24 (on Studer Board website this corresponds with FW 25.91 but i have 13.83). Can there be a mismatch between the board and firmware? My deck’s S/N is 2223 which puts it somewhere 1984-1985.
Please advise
Hello Lucian,
1. this is not good. I suspect a fault MPU board
2. could be the same issue
It could also be a problem with the voltage from the power supply, or some logic issue. It is difficult to tell.
-Philip
Yesterday i removed all ICs from their sockets, cleaned them and reseated them. It seems it helped, the faults are occuring less, and i was able to rewind a tape a couple of times back and forth. However i will try to find someone with a spare MPU board to see what’s happening.
There are new MPU baords made
Yes, I know. I will try to install a new firmware first then if that’s not working i will buy a new board.
I also checked the voltages from power supply, I had + 24.6V, +5.56V, -15.58V, +15.44V which seems to be ok.